
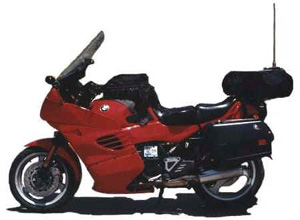
The Rolling Bordello is a 1995 BMW K1100RS. Richard has added many of the typical Long Distance Rider favorites, and a few trick creature comforts as well. There is a list of the mods below, or check out the popout window!
Modification Philosophy
All modifications were chosen/designed as bolt-on, with minimal changes performed upon the stock BMW K11RS platform. The only stock K1100RS part which has been modified in creating the Rolling Bordello has been the fuel injection return line, which required a 't' fitting be inserted for the fuel cell transfer system. All other modifications, including all wiring changes, have been made outside of the stock platform, and can be removed and/or bypassed without harm to the functioning of the underlying bike. Given a weekend's worth of time, this bike could literally be a bone-stock BMW K11RS once again.
As well, all modifications were conducted in such a fashion as to provide complete system redundancy wherever possible, and designed with on-the-road survivability in mind. For example, the driving lamps are deliberately mounted inside the outer 'plane' of the motorcycle, and on stable yet malleable brackets positioned above the mirror pods. In the event of a tip-over, the lights should remain intact (no ground contact), will not interfere with the functioning of the mirror pod pop-off mechanism, and will not be in a position to cause damage to the bike, as could an under-the-mirror mount design. Of course, driving lights work best when mounted as high as possible on the vehicle, so the light bracket design successfully marries primary mod function with the goals of ensuring that no modification should be capable of rendering the bike unrideable due to failure or damage. This type of approach has been carried forward to all aspects of the Rolling Bordello wherever possible.
List of Modifications
Parabellum windscreen kit w/ extra tall (22") windscreen
This 2-part windscreen kit (painted base which fits on stock screen area, with the windscreen fastening to the base) creates a air pocket which is perfectly sized for me, with the air just nipping the outside edges of my arms and the top vent on my helmet. Viewed from the front, the profile of the bike is quite narrow, which is important to maximize the fuel efficiency of the bike. The windscreen kit utilizes a air bleed vent, aka "balance vent", to help maintain the air pocket and allow the windscreen to provide full coverage while still allowing the rider to look over the screen.
Driving lights – Catz XLO
The stock headlight low-beam pattern is actually pretty good, but the high-beam pattern leaves a lot to be desired in terms of brightness and light distribution. Accordingly, I've elected to mount a set of driving lights specifically chosen to augment the stock high-beam. The Catz XLO lights are 70w (each) 30-degree-beam-spread driving lights. I chose to use the Catz XLO's over the ubiquitous PIAA 910-series driving lamps for one primary reason – SIZE. The XLO's have a much smaller form-factor (PIAA 1000-sized) and weight less than half of the PIAA 910's. This reduces the stresses imposed by the lights upon the light mounting brackets and supports, and creates less wind resistance. Having settled n a form factor, I chose the XLO's specifically for their beam spread; they are quite efficient in their projection of light, with little light wasted in the vertical plane. This makes them much more useful as a driving light than, say, the PIAA 1000-series lights (which have a >90 degree beam spread and waste a lot of light in the vertical plane).
The lights themselves are mounted on custom turn- signal- pod- mounted brackets, and are operated via stock high-beam switch. I chose to mount them to the mirror pods in order to give them as much reach as possible (height), as well as keeping them out of harm's way in the event of a bike tip-over/spill. The brackets are 3/16" 3000-series aluminum, and are retained by being sandwiched between the turn-signal-pod mounting bracket and the rubber spacer for the turn-signal pod mount. The brackets are designed to allow the mirror pods to detach normally in the event of a spill.
The lights are specifically activated only by the high-beam switch in order to reduce the effort required to activate/deactivate them. They are sufficiently bright that I cannot run them in most any circumstance which would not also tolerate high-beam usage, so this setup is efficient and easy to use.
"Conventional" 80/100 headlamp bulb
(i.e. non-SuperWhite)
I tried the Raybrig SuperWhite high-output bulbs, and while they appeared to last well, I was uncomfortable with the color of the beam. I have elected to go back to a "standard" 80/100 H4 reinforced-filament bulb. Given that the headlight circuits have been relayed and rewired using 14ga. wire, I have the option of running higher-wattage bulbs without fear of damaging the stock headlamp switch or circuits. Consequently, I am running a 80/100 bulb reinforced-filament H4.
Aeroflow Headlight Protector
This mod is a double-edged sword. It certainly will protect the (expensive) headlamp assembly from FOD damage, but it does so at the expense of the loss of some light transmission. Given the possibility of losing the headlight while on the road due to impact damage, I have chosen to accept the loss of light transmission and use the headlight protector.
Russell Seat
This is, IMO, the single most important modification to any bike that will be used in long-distance riding. I have ridden hundreds of thousands of miles on Corbin seats, Sargent 'SuperCell' seats, Mayer seats, BMW accessory seats, and stock seats – nothing, but nothing gives better all-day support without pain or discomfort as does a Russell. One of the most fatiguing factors in riding long-distances On a motorcycle is discomfort with the saddle. It is almost impossible to explain how much further and more alertly one can ride on a Russell seat, but suffice it to say that I won't ride on anything else.
If you can make only a single modification to a motorcycle to prepare it for long-distance riding, this is the one.
K75C bars
(cut-down stock K11RS dash pad)
I have always been a fan of taking some of the stress off the 'butt and lower back while riding via a forward lean of the torso. However, such a riding position requires a fair amount of airflow on the torso in order to relieve the pressure such a riding position brings upon the wrists and shoulders. Since this bike was being designed to ride very long distances in all weather conditions, full airflow over the torso was not an option. Accordingly, a set of handlebars sourced from the K75C model were chosen to replace the stockers. The K75C bars are approximately 4" taller and have a bit more pull-back than the stock K11RS bars, yet are a good 4" lower than the K11LT touring handlebars. This gives me a perfectly-balanced riding position – not tilted back or bolt upright, but not leaned forward so far that the shoulders and wrists complain.
Given that the most BMWs use a dashboard pad to mount the accessory switchgear (e.g. heated grips, hazard switch, ABS reset switch), the stock K11RS dashpad required some modification in order to clear the new bend of the K75C bar. In all, about 3" was removed from each side of the dashpad, and the ends dressed on a bench grinder.
Bob Weis inner fairing pockets
These pockets replace the stock BMW inner fairing vent louvers with a fabric pouch and cover. The pouch is 7"long x 4" wide x 5"deep, and mounts to the bike via Velcro. These are incredibly handy for storing cigarettes and other such odds-n-ends.
In-dash cigarette Lighter
I smoke. Not a great habit, but it's one of my few current vices. I have found that riding long distances can be difficult for me without stopping every couple of hours for a quick cigarette. Since I hate wasting time just for a smoke, I mounted a BMW accessory cigarette lighter in the left inner fairing panel. Now I can smoke while I ride and keep the nicotine-deprivation-related edginess and loss of attention to a minimum. Yeah, it's probably pathetic, but hey – it's me. J
BMW Throttle Friction Screw
(aka the hillbilly cruise control)
This is a controversial mod. Many LDR folks believe that a 'cruise control', be it a true electronic cruise control or something as simple as a throttle lock, is a BAD THING for long-distance motorcycle riding. The primary concern is that, should the rider momentarily snooze, the bike will not naturally snap the throttle shut (either waking the rider up and alerting him to his condition or at least reducing the speed at which the rider will crash). Others believe that a cruise control of some form or another helps reduce rider fatigue and thus makes it less likely that a rider will encounter a fatigue-related problem.
Having said all of that, I have run a throttle lock/friction device on my last five motorcycles. I find it invaluable in allowing me to relax my right hand/wrist when droning along the freeway. Ya pays yer money and ya takes yer chances..
Custom upper dashboard with two map lights & V-1 remote display
This is a mod made possible by the use of the Parabellum windscreen. The Parabellum screen has two small fasteners along the top of the bottom section, i.e. that section of the kit which covered the stock BMW K-RS windscreen. These fasteners provide the means to attach a small (12" wide x 2" high) dashboard just below the normal line of sight. On this dash, I have several battery-operated waterproof map lights (one aimed at the tankbag map pocket and one at the sleeve pocket of my Roadcrafter) and the Valentine V-1 remote display.
Multivario tankbag, with 3-pocket fanny pack addition holding a 64oz. CamelBak
Given that I own Eclipse, OSI, and Bagman tankbags, I nevertheless chose to buy and use the (very expensive) BMW Multivario tankbag. I made this choice for two reasons; stability when loaded and utility while under the rain cover. The Multivario attaches to a base which is very firmly snugged onto the tank – it will tolerate VERY heavy loads without shifting around. As well, the Multivario is the only tank bag I've found which has a clear top to its rain cover, allowing the maps To be read even when the rain cover is installed. (If you've never done A lot of traveling cross-country in the rain, you won't appreciate What a big deal this is, but trust me – it is.)
To augment the Multivario's capacity, I strapped a 3-pouch fanny pack around the Multivario, with the pouches facing the rider's seat. This allows me to store my CamelBak in a location which is accessible and which allows the CamelBak to produce condensate in the summer without fear of soaking important travel items (as happens when placing the CamelBak in the tank bag itself). I chose the 64oz/ CamelBak because It is designed to be mounted "landscape", i.e. with the long dimension Horizontally. It is a bit larger than the fanny pack pouch itself, but Can be fitted into the fanny pack when slightly less than completely filled.
Chatterbox HJC-27A CB, with custom antenna mount and Wilson 2000 center-loaded whip antenna (5" stalk)
Running a CB on a motorcycle used for cross-country travel is, IMO, invaluable. The important key for me was to be able to multiplex the audio signal from my radar detector into the CB headset. Fortunately, Chatterbox makes a bike-to-bike communicator which is simply a CB unit. Even more fortunately, this Chatterbox setup comes provisioned with the capability to integrate external audio sources into the CB audio, relieving me of the hassles involved with building/buying an external interface box. While the Chatterbox unit is not perfect (it defaults to Channel 9 each power-on, it prioritizes CB audio over the external audio signal), it is a simple and self-contained setup that is less than half the cost of competing solutions.
The unit comes with a weather-proof Push-To-Talk (PTT) switch, headset, antenna, antenna bracket, a mini-tank bag to hold it all, and the CB unit itself. The CB unit is about five inches long, three inches wide, and two inches thick. The controls are sized such that they can be operated with gloves on. The radio unit is NOT weather-resistant, and must be kept from getting wet. Since I am using the Multivario tank bag, I am not using the supplied Chatterbox bag but have the Chatterbox radio tucked into the left side of the Multivario top compartment.
I found that the supplied antenna and bracket were less than useful For true CB-range communications, and had fabricated a custom bracket which locates the CB unit off my rear luggage rack. I chose a Wilson Trucker-2000 antenna, because it gives outstanding transmit/receive Range and is a whip-style (which places less stress on the antenna mount than would a fiberglass style antenna).
Valentine V-1, w/ remote display and audio adapter
(audio fed into Chatterbox headset)
There is no doubt in most rider's minds that the Valentine V-1 is simply the finest radar detector on the market. It is pricey, but the cost is easily offset by the potential increase in insurance premiums along which would result from speeding tickets. BTDT.
Mounting the V-1 is always a compromise. Mounted up on the dash area is best, in terms of radar and laser detection, yet exposes the unit to rain. Most folks who run radar detectors in exposed mounting positions wind up simply disconnecting and storing the unit during inclement weather, eliminating their detection capabilities entirely. (Those who do not are forced to concoct protective sheathing for the unit.) OTOH, mounting the unit in a weatherproof location reduces the unit's ability to sense radar and in most instances eliminates the unit's ability to detect laser, yet allows the unit to operate under all weather conditions.
Since I knew that I wanted to have the V-1 audio piped into a helmet-mounted headset, I also needed to contend with the potential location of the V-1 Remote Audio Adapter. As a result, I chose to run the V-1 inside my tank bag, and simply accept the loss of laser detection. This ensures that my radar detection capabilities are consistent regardless of weather conditions, and provides the physical mounting space needed for both the V-1 unit and the Remote Audio Adapter.
Since I am running the HJC27A headset, I am piping the audio output of the V-1 directly into the HJC27A unit. The V-1 and Remote Audio Adapter are fed switched power from a relayed and fused accessory circuit, as is the HJC27A.
To compensate for the loss of visual warning from the V-1 (the bogey counter and directional indicators are very useful) as a result of locating the V-1 in the tank bag, I also am running the V-1 remote display module on the custom dash, just below my line of sight. This unit has been made weather-resistant by sealing the case with dielectric grease and electrical tape.
Koni 2615 Rear Shock
When I started this project, I had an Ohlins shock mounted on the Bike, with remote reservoir mounted on the right under-seat rear subframe tube and remote preload adjuster strapped under the seat on the left subframe tube. However, I found that I could not mount the rear luggage rack with the Ohlins in place, since the remote reservoir was occupying the space that the rack needed for its mounting brackets. Rather than deal with re-plumbing the hoses on the Ohlins, I sold it and bought the Koni.
The 2615 is an fairly ugly steel-bodied shock which gives up a lot of aesthetics to make a price point. The four position dampening adjuster is linked, i.e. it adjusts rebound and compression dampening settings simultaneously. It does *not* come with a preload spanner, nor is it rebuild able. The nitrogen gas is contained within the shock body as opposed to inside a remote reservoir, which some folks don't like.
Given all of that, I like it. It uses the ubiquitous washer-stack dampening system, and the high/med/low speed washer stacks seem to have been chosen with good all-around settings. As well, the linked dampening settings seem well matched for *most* circumstances; there have only been a few occasions when I wished for independent dampening settings. It's stiffly sprung as built, so I have not missed the preload spanner yet. The lack of rebuildability was not a major issue for me, since the 2615 (like most Koni products) has a lifetime warranty - I expect that when it gets a bit tired, I'll just turn it around and ask for a warranty exchange....
RaceTecH .9kg/mm fork springs, 15w oil and R100GS fork gaiters
One thing which is a given on any BMW motorcycle – the stock fork springs will be far too soft for best comfort or handling. Given the difficulty of finding the White Power fork springs, I chose to try the RaceTech fork springs. The stock fork springs are .55kg/mm in spring rate, and RaceTech makes from .7kg/mm thru .9kg/mm springs for the K11's. My instinct was to run the .7kg/mm springs, since that rate represented a modest increase in spring stiffness from stock without sounding too harsh. RaceTech STRONGLY advised running the .9kg/mm springs, and with some misgivings I agreed to try them. They also recommended running 15w oil in place of the stock 7.5w. RaceTech was absolutely correct in their recommendations.
Turns out that the stock fork springs run far too much preload (45mm), in an attempt to compensate for the soft rate. Using the RaceTech .9kg/mm springs, 25mm spring preload, and the 15w fork oil, the ride is much more plush than stock, yet much more controlled.
While I had the forks off the bike for the spring installation, I also installed a set of fork gaiters originally designed for the BMW R100GS. This will ensure that my fork tubes don't get nicked during a ride and cause a cut fork seal/oil leak.
Reynolds Rack #241, w/ FIVE custom braces/fuel cell retainer brackets & FuelSafe CT105 5-gallon fuel cell
I wanted to add additional fuel capacity to the bike, to increase my flexibility in choosing when to stop for refueling. The choices were:
- Stock tank expansion
- Fuel Cell on passenger seat area
- Fuel Cell on luggage rack
The first option was bypassed both for aesthetic reasons and because it provided a limited increase in fuel capacity compared with the other two options. It was also the most expensive option.
The second option required the most re-work of the stock platform (solo seat and custom tail section), and was also quite expensive.
The last option gave the most fuel capacity for the least cost, but at the expense of the worst mass centralization. Nevertheless, I chose to implement a rack-based fuel cell, in keeping with my budgetary constraints and my desire to make minimal changes to the stock bike.
The fuel cell platform is based upon a Reynolds Rack, P/N #241. The cell itself is a FuelSafe Fuel Cell #CT105, with their SF4X6A filler plate, a 90 degree -6 AN top vent, and a –6AN bottom/rear/left 90 degree fuel pickup.
Since the K11RS is fuel injected, setting the auxiliary fuel system up as a transfer-based system was the easiest and most logical approach. The system is designed to use the stock fuel tank/pump as the primary feed for the injector system, with the auxiliary fuel being pumped into the main tank when the main tank empties.
To accomplish the fuel transfer, a NAPA Fuel Pump, #2P74019, is mounted below the Reynolds Rack on the tail section, and is fastened to the stock luggage rack. The fuel output from the cell passes through a Fram fuel filter, #G3606, into the pump, and is pushed forward thru 5/16" fuel injection-rated fuel line. A manual shut-off valve is placed in-line, just below the left sidecover, to allow the fuel connection between the cell and the main tank to be physically shut off. (This is often necessary to prevent "bleed-down" of the cell into the tank; should the tank be full when such a siphon occurred, the tank would overflow out the vent lines and dump gasoline all over the pavement under the bike.) The shutoff valve is a Tempo Marine shut-off valve, P/N #303-FSO, and us UL-rated for gasoline usage. The fuel cell is vented from the top, and an elbow vent line was constructed from a combination of 3/8" and 7/16" breather hose, along with a PCV 90 degree connector. The fuel pump is activated by a Cole Hersee Marine Rocker switch (lighted when ON), P/N #56327-01. The switch is located on the stock dash pad, just to the left of the ignition switch. It is wired from the front parking lamp circuit, and is used to activate a relay which in turn drives the pump. This ensures that the pump has its own fused power source, and the pump cannot be activated unless the ignition is 'ON'.
The fuel cell is placed onto a set of rubber mats that sit upon the Reynolds Rack. Rubber mats were chosen to ensure a high-friction surface between the cell and the rack. The rack was augmented with three custom brackets (one per side and one in the rear) which positively locate the cell onto the rack. Additionally, a set of brackets were fabricated to tie the front of the rack directly to the bike's subframe, eliminating the likelihood that the rack would rock fore-n-aft under the load of the fuel cell. (All of the brackets were designed to use the holes provided on the rack for bungee tie-downs, eliminating the need to modify the rack itself.) Finally, two 1" nylon web straps are used to vertically secure the cell to the rack .
Wave Products fuel cell cover/luggage
This luggage covers the fuel cell, and adds four (non-weatherproof) storage pouches to the luggage capacity of the bike. The cover was made as a custom, limited product piece by an outfit in SLC, UT named Wave Productions. To the best of my knowledge, no more are being made. I was fortunate enough to find one of the ones left in the Reno BMW stock when they went out of business.
Run-n-Lites KTAIL2 rear taillight enhancement kit
This kit augments the rear visibility of the bike by converting the brake light bulb to a dual filament design,, thereby increasing the taillight output. It also adds two smaller brake lights in the unused side compartments of the stock K11 tail light lens, more than doubling the brake light output. In all, tail light output is doubled and the brake lamp output is more than doubled.
Spezial 3M-based pannier reflector set, in red
This is a set of pre-cut decals, based upon the 3M retro-reflective tape. Normally found in black (which reflects white at night), I found a set of them in red, which reflects red at night.
Jumpered sidestand safety switch
The sidestand lockout switch on the K11's interrupts the ignition system to prevent using the bike with the sidestand extended. The switch which provides the "sidestand up/sidestand down" signal is positioned at the top of the sidestand, and is exposed to all sorts of road grit and other nastiness. These have been known to fail, and in doing so render the bike unrideable.
Based upon my philosophy of not allowing any single system to cause the bike to be unrideable, I jumpered this circuit such that the sidestand always looks retracted, regardless of sidestand position. Also in keeping with my "don't alter the stock bike" philosophy, this was accomplished by making a jumper and jumpering the sidestand lockout switch circuit directly off the main harness. The switch and all assorted wiring remains intact and untouched – all I have done is unplugged the sidestand switch's connector off the main wiring harness and inserted a pin-to-pin jumper in place of the switch connector.
To re-establish the switch circuit's stock configuration, I simply pull the jumper out and reconnect the two halves of the connector.
Jumpered clutch lockout switch
See above. The clutch lockout switch will prevent the engine starter circuit from activating if the bike is in gear and the clutch is not pulled in. This switch has been known to fail, and if this failure is coincident to the failure of the gear/neutral indicator, the bike cannot be started. Again, this circuit was jumpered at the connector which links the switch to the main wiring harness.
Converted instrumentation lighting to amber
I find the BMW K11 green instrumentation lighting to be quite fatiguing on the eyes. I replaced the stock instrument cluster's 194G (green) bulbs with 194NA bulbs sourced from a local auto parts store. I removed the mini-bulbs from the fuel level and engine temp gauges, peeled off their green vinyl "condoms", and gave each a VERY light coating of bright orange nail polish. The result is amber lighting on all instrumentation, and (for me) reduced nighttime eyestrain.
Increased the preload on handlebar rubber mounts
The stock K11 handlebars are loosely mounting in rubber grommets sunk in the upper triple clamp. The loose rubber mounting of the handlebars sacrifices handling "feel" in favor of vibration dampening. Since I did not feel that the vibration of my K11RS was objectionable, I chose to tighten up the handlebars by removing some of the play in the rubber mounting. I used some large copper washers, with an IDD large enough to slide over the handlebar mounting stud's collar - I seen to recall that the ID was ~20mm. I removed the nut holding each handlebar clamp onto the upper triple clamp (through the rubber grommets) and slid the copper washers onto the stud. I then re-attached the mounting bolt, pressing the copper washers into the rubber and removing a significant amount of the free-play in the grommets. The vibration felt in the handlebar is still quite insignificant (IMO), and the front end feels tauter and more connected.
Increased the stiffness in the rear saddlebag mounts
One of the characteristics which I noted about the BMW K11's is that the panniers tended to wiggle about a great deal. This movement occurred whether the panniers were loaded or full, but was most noticeable when they were loaded. I determined that the majority of the movement was being caused by the rear of the footpeg mounting bracket bending back and forth under load. Since the front of the pannier mounting bracket is anchored onto the footpeg mounting bracket, excessive movement of the footpeg bracket was allowing the panniers to flop around.
The footpeg mounting brackets are held in place by two large bolts at their front (directly above the rider's footpeg) but are loosely pinned at the rear against a large rubber doughnut. I experimented with a solid mount in place of the rubber doughnut, but the resultant vibration in the left footpeg 9from the exhaust mount) was uncomfortable. Yet the stock rubber doughnut was quite soft, and I was concerned that the excessive saddlebag movement would eventually weaken the pannier mounts, leading to a failure.
To firm up the rear of the footpeg mounting bracket (and as a result the pannier mounting), I took a hard rubber upper shock bushing (designed for an American full-size car's front a-arm suspension shock mounting), and milled out the ID such that I could use it as a replacement rubber isolator. After bolting everything back together, the firmer rubber bushing allows much less side-to-side movement of the back of the footpeg bracket (thereby decreasing the wobble of the panniers) without causing an increase in the vibration of the footpegs.
Relayed headlights
Added separate high-beam and low-beam relays, fused thru the factory fusebox and operating the headlamp over individually-run 14ga circuits. The power for the circuits is pulled from the positive (unswitched) side of the starter relay, run the bottom (unused in stock form) fuseholders in the stock fusebox, and routed forward to separate high and low beam relays hidden under the left inner fairing panel. Switching for the relays is gained from the stock headlight connector, using male plugs which plug into the stock headlight connector.
Additional Circuits
I also (as could be surmised from the above) added three individually fused 14ga circuits. One for Catz driving lights, one for the fuel transfer pump, and one for the electronic accessories. The driving light relay is switched by the high-beam signal (piggybacked off the high-beam relay), the fuel pump relay is fed switching signal from the parking lamp circuit and toggled via a dash-mounted switch, and the accessory relay is also fed switching signal from the parking lamp circuit (such that the electronic accessories are switched on and off via the ignition).
Additional Accessory Socket
Having lost heat during a coast-to-coast ride during January due to accessory socket
problems, I have become acutely aware of the dependency which I place on heated riding
gear. As a result, I have mounted a second accessory socket on the bike, to provide a
backup source of power for my heated clothing.
The Bike
The Competition
Sponsor Bernie!
• Motel
• Gas
• Equipment
Trip Reports/Rally results
Ask Bernie!
Home
Ted Verrill, Counsel to the Stars |